In this article we explain how to manage the custom fields in HubSpot.
Create and edit properties
Properties are fields that store information on HubSpot records. For example, you can use the City company property to specify where companies are located. There are default properties included for each object, but you can create custom properties to store unique data for your business.
You should check whether a default property can meet your data requirements before creating a custom property. Learn more about the default properties for contacts, companies, deals, tickets, and feedback submissions.
You can also organize, clone, archive, and export properties from your settings. If you want to view or update values for properties, learn how to edit property values on a record or in bulk.
To create and edit properties:
-
In your HubSpot account, click the settings settings icon in the main navigation bar.
-
In the left sidebar menu, navigate to Properties.
-
Click the Select an object dropdown menu, then select [Object] properties to create or edit a property for that object.

-
To locate certain properties:
-
In the upper left, use the dropdown menus to filter by property group, field type, or which user created the property.
-
In the upper right, enter the name of a property in the search box to find a specific property.
-
To sort your properties, click a column header.
-

-
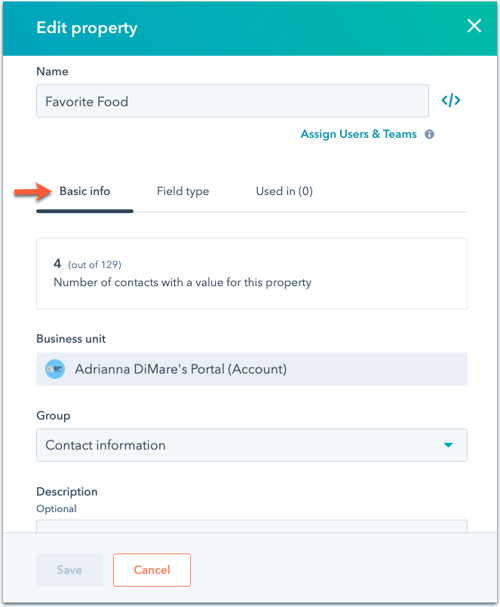
To create a property, in the upper right, click Create property. To edit an existing property, click a property’s name in the table. Some properties cannot be edited, including certain default properties, or properties in use on records or in HubSpot tools, such as lists or workflows.
Please note: you must have Edit property settings permissions to create or edit properties. The number of custom properties you can create depends on your HubSpot subscription. If you downgrade to HubSpot's free tools, you can view and edit existing custom properties but cannot create new properties if you already exceed the limit.
-
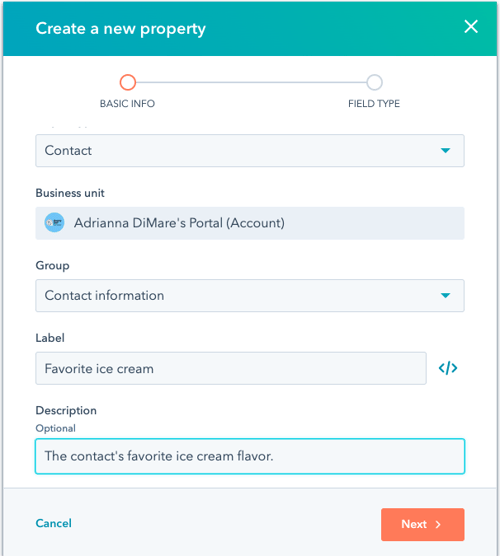
In the right panel, set or edit the property’s basic information:
-
Object type: if creating a property, select the object that will store the property. By default, this is the object you selected earlier. Object type cannot be edited once saved.
-
Group: select the property group that the property will belong to. A property group is a label used to group similar properties within an object. These are used only within the properties settings.
-
Label/Name: enter or edit the property's name. This is the name of the property as it appears in your HubSpot CRM, including on records and index pages. For example, Company name is a property label. A property's name must be unique in order to create or edit the property.
-
Internal name: click the code code icon to set or view the internal name for the property. This is the internal value of a property that is used by integrations or APIs. For example, the internal name for the Company name property is name.Once a property is created, the internal name cannot be edited.
- Description: enter text to describe the property. This is not required to create a property.


-
If you’re creating a new property, click Next. If you’re editing a property, navigate to the Field type tab.
-
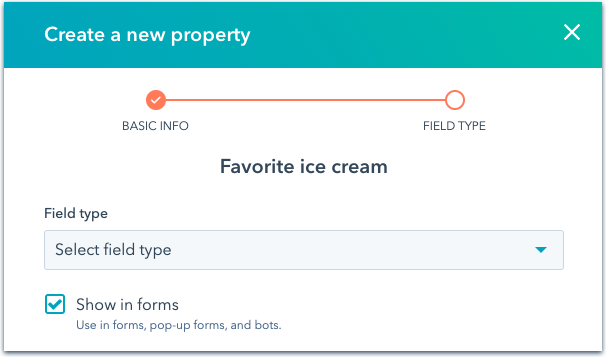
To set or edit the property’s field type, click the Field type dropdown menu, then select a field type for the property.

Please note: changing an existing property’s field type can invalidate current values stored in the property. It is recommended to export all information prior to editing a property's field type. A property's field type cannot be edited to Score, Calculation, or Date, and properties of those types cannot be edited to another field type.
-
By default, properties are included as field options in your HubSpot forms, pop-up forms, and bots. If you don't want the property to be an option, clear the Show in forms checkbox. Product properties cannot be included in forms or bots.
-
There are additional steps for certain field types:
- Single line text or Number:
-
-
-
For new deal or custom object properties, select the checkbox to require unique values for the property. With this turned on, users will be unable to enter the same value for multiple records. You can create up to ten unique value properties per object.
-
If your account has an Enterprise subscription, select the Allow users to search for information entered to this field checkbox to make values in the property searchable across objects in the global search bar. You can create up to three searchable properties per object in your HubSpot account. Users must have Account access permissions to search by the field type you configure.
-
-
Calculation or Score: click Build [calculation/score], then set up your calculation property or score property criteria.
-
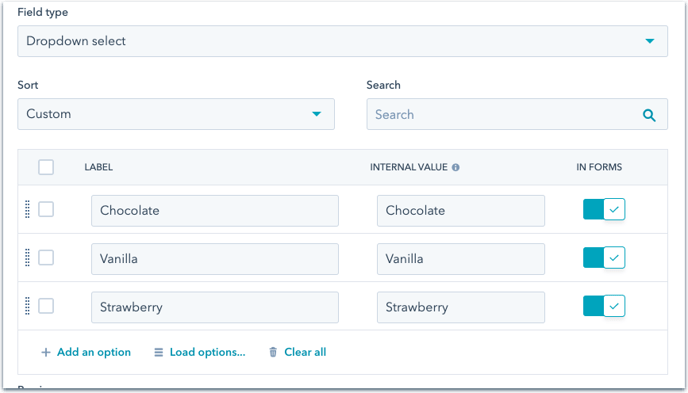
Multiple checkboxes, Dropdown select, or Radio select:
-
Enter or edit the different options for the property:
-
Label: enter the name of the option. The option's Internal value is automatically generated based on the label.
-
In forms: click to toggle the switch on to include the option for forms.
-
+ Add an option: click to add a new option.
-
Load options...: click to load multiple options at once. You can select a default set of options, such as Country and Timezone, paste text to create options in bulk, or copy the options from an existing property.
-
Clear all: click to remove all existing options.
-
-
-

-
-
- To edit the options in bulk, select the checkboxes next to the options. At the top of the table, select:
- Hide in forms: click to hide the selected property values from appearing in your HubSpot forms as options.
- Merge: click to merge the selected property values. This will result in the merged values being removed from the property, leaving one value. This may affect integrations and tools that rely on a specific property value, such as list and workflow filters.
- Delete: click to delete the selected property values.
- Click and drag the dragHandle drag handle to manually reorder the options, or click the Sort dropdown menu and select Custom or Alphabetical.
- To edit the options in bulk, select the checkboxes next to the options. At the top of the table, select:
-
- Once you’re done, click Create or Save at the bottom of the panel.
