
A series of instructional videos for clients when onboarding in HubSpot. How to create a task.
How to create a task:
Keep track of your to-do list in HubSpot by creating tasks. You can create tasks as reminders for specific records and manage multiple tasks in task queues. Sales or Service Hub Starter, Professional, or Enterprise users can also create recurring tasks.
You can also plan your tasks based on your schedule and past performance, or automate tasks based on deal stages.
Once you’ve created tasks, learn how to edit, complete, and delete tasks.
Instructions:
1. Navigate to the Task dashboard in HubSpot Sales > Tasks
2. In the upper right corner, click Create task
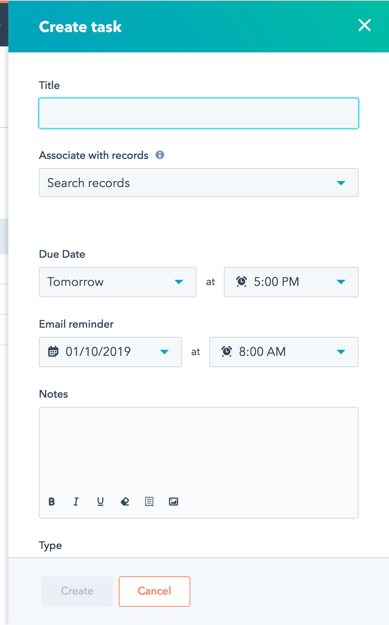
3. Enter task information
- Title
- Associate with records: Contact, company, deal, and/or ticket the task pertains to
- Due Date: Date the task needs to be completed by
- Email reminder: Email a reminder to the owner responsible for the task prior to the due date
- Notes: Additional information or instructions
- Type: To-Do, Email, Call
- Queue: Task queues can be created and used to organize to-do lists and complete tasks in a series
- Assigned to: Owner responsible for the task (must have access to HubSpot)
4. Click Create
How to edit a task:
- In your HubSpot account, navigate to Sales > Tasks.
- At the top, click the tabs to select a default task view or a task queue you’ve created. You can also edit, reorder, or delete your task queues.
- Use the search bar to search for a specific task by name.
- By default, you will view your own tasks. Depending on your user permissions, you can filter by who the task is assigned to. To view tasks assigned to specific users, click the Assignee dropdown menu, then select the checkboxes next to the users' names. You can also select the No assignee checkbox to view tasks that have not been assigned to any HubSpot user.
- You can use the quick filter dropdown menus to filter the tasks you want to view:
- Task type: select from Call, Email, or To Do.
- Due date: select a time frame based on the current date (e.g.Tomorrow, Next month).
- Queue: select from one or multiple existing task queues.
- To add or edit additional filters, click More filters, then in the right panel:
- To add a filter, click AND, then select a task property. Set your criteria, then click Apply filter.
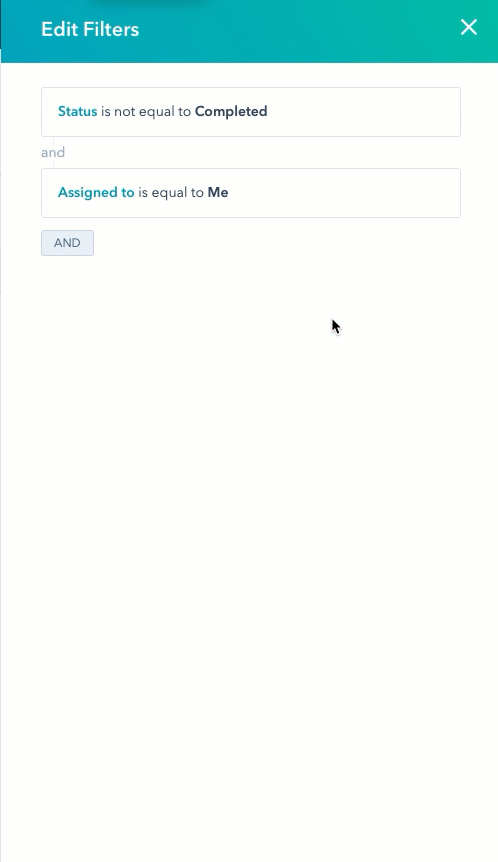
-
- To remove an existing filter, hover over the filter, then click delete Delete.
- Once you're finished, click the X in the top right of the panel.
- To remove all filters, click Reset filters.